
Building cages is not usually as difficult as most think it to be. However, a certain level of ability with tools and the material being used is required. This page will list tips and tricks I have found over the years that may make your cage building ventures a little easier. It will change, probably a lot, before it is complete. I’ll be adding things as they come to me, and rearranging things until I think the page will be of benefit, and retain at least a resemblance of being organized.
First off, we need to get cage building in perspective. Three main things must be considered when designing or building a cage – function, design, and aesthetics. Let’s look at these and how they will affect your cages.
- Function - This is the most important consideration. The cage must meet all the needs of the animal it is to house. There is no room for compromise with this. When designing a cage, ask yourself these questions:
- What is to be housed in the cage?
- Does the cage provide adequate space for the species?
- Can proper heat and humidity levels be maintained?
- Is the cage escape proof?
- If there are any species specific requirements such as arboreal or burrowing needs, does the cage satisfy them?
- If the cage is to house venomous species, does it provide for the safety of the keeper when servicing the cage?
- Design - This concerns you, the keeper. Is the cage easy to use and service? The cage must not be a chore to clean. For instance, do not make a 4 foot tall cage that only opens from the top. If getting in the cage to clean and care for the animal is a pain, then the level of care provided will eventually decline. Also in this category is how difficult will it be to construct? Try to know your own abilities, and don’t design a cage that is beyond the scope of what you can build with the tools and knowledge you have available. A simple, well kept cage looks much better than a cage that was meant to be a beautiful piece of furniture, but is out of square and the corners don’t meet.
- Aesthetics - This is the final consideration, and is entirely up to the keeper. How does the cage look? You have to decide what you want the cage to be, a simple box to be kept in the herp room, or a nice piece that you want to display in the living room. It really makes no difference either way, this one is completely up to the tastes of the keeper.
The challenge here is to find a balance between these three things. Keeping in mind that the needs of the reptile have priority and cannot be compromised. Now on to the cage building.
Questions to be answered
There are a few things to ask yourself before you set in to cutting the wood.- How will the cage be heated?
- Will there be any supplemental lighting?
- What type of doors will be used, and how will they latch?
- How will the cage be ventilated?
Decide the answers to these questions before you start building, so you can make allowances to accommodate them.
For instance, if the doors are to be sliding glass, then a place to mount the track will be required. If the method of heating is by a basking light, then either permanent protected fixtures will be needed, or a screen in the top for the light to shine through will have to be incorporated into the design.
Tools
There are a few tools that are basically required to do any real cage building, and others that are a great benefit, but can be done without. A basic list of tools I use are:
Electric tools
- Table saw – can’t beat it for making good cuts, and ripping boards to a narrower width.
- Circular saw – You’ll pretty much have to have one of these, although a handsaw can be used to a certain extent with much difficulty.
- Jigsaw – Great for cutting out square vent windows. Can be done without it, but these are not expensive saws, I recommend getting one if you intend on doing much cage building.
- Palm or belt sander – If you want a good finish on a stained cage you will find one of these to be extremely useful, particularly after you’ve hand sanded a cage or two.
- Hand drill – this can be either cordless or not, but either way it is invaluable, and required when screwing a cage together. Most woods do much better when you pre drill holes for the screws, and then the screws are much easier to put in with a drill rather than a hand screwdriver.
- Screw gun – This is a drill designed only to sink screws. They have a hammer function that as the screw starts to tighten it ratchets it down to keep from over tightening. Not required, but very handy to keep from having to constantly change bits in your drill.
- Router – This is not really required, but for certain things you might want to do, there will be no other way to do them.
- Compound Miter Saw – I use this to cut the 45° angles for some of my door frames and vent window framing and to make straight cross cuts on any pieces less than about 4" wide. A miter box can be used instead. This is a box with a hand saw that is equipped with slots for 90° and 45° cuts.
- Brad nailer – Not an electric tool, it's air powered, but I include it here. Another tool that is not required but is very handy to tack a cabinet together before you use the screws. It will help keep you from getting out of square during assembly. Also great for attaching trim pieces.
- Tri-square and 2’ square – making square cuts is essential when building cages you will want these.
- Tape measure – this is just a given
- Hammer – Another given
- Hole saw – these are round saws that you chuck into a hand drill, or even better, a drill press. They make very nice vent windows to be covered with screening.
- Nail set – this is a tool used to set finish nails deeper in the wood so they can be puttied over for a better look. I like to use them on the trim work.
- Countersink – use these to set the heads of screws in flush with the surface of the wood. To get real fancy, there are special countersinks used to cut a deeper hole for wooden plugs to be used over the heads of the screws.
- Tinsnips – great for cutting hardware cloth or other wire mesh
- 90° clamp - This is a clamp used to secure two pieces of wood cut on 45° angles. I use four of them to make my door frames.
- Clamps - a woodworker can never have too many clamps. Pipe clamps, spring clamps, F-style clamps, parallel clamps, you'll find uses for all of them.
Materials
What are you going to make the cage out of?
Your choices are varied, and each has different pros and cons.
- Melamine
- Plywood
- Shelving Board
- Wire
- Hollow Core Doors
- High Density Polyethylene (HDPE)
Melamine is a good cage building material, it holds up well over time, and is easy to clean. It’s fairly easy to work with, and makes a reasonably nice looking cage. Melamine comes in a variety of forms. You can get the standard 4x8 sheet, as well as pre cut pieces in 12, 16, and 24 inch widths, both 4 and 8 feet long. Colors are also available, however in my area all I can get in the basic white, and the wood grain. The biggest drawback with melamine is the weight. This stuff is heavy. I have several cages made of it that I cannot possibly move by myself.
Plywood is good and bad, depending on the way it is used and what type you get. Exterior grade plywood, while cheap, is difficult to get a decent looking cage out of. The better the grade of plywood, the higher the price. There are very nice plywoods available, even some cabinet grades that make beautiful cages, but these can run in excess of $50 per sheet. In my opinion, at least a B grade should be used.
I do prefer plywood over melamine myself though.
Pine shelving board has a place in cage building. Shelving board comes in various widths up to 12”, and is ¾” thick. While the width does limit it’s uses, it also makes it easier to use for those who are not really skilled with a cricular saw. When you can use the board with it’s factory width, the number of cuts needed is half, and therefore the chances of making a cut that is not square is also half.
Narrow widths also are great for door frames and even trim pieces in some situations.
Wire has limited uses, and I definitely do not recommend all wire snake cages. For some lizards though, wire works very well. If you are thinking of building a cage for a lizard out of wire, I would suggest you find rubber coated wire mesh. This type of wire is easier on the animals feet, and reduces the chances of any damage from nose rubbing.
I began using hollow core doors to build racks for large tubs and have been very satisfied with the results. I've been wanting to try them for a conventional cage build but haven't as of yet. Their strength combined with their light weight and perfect dimensions make them well suited to build racks especially.
HDPE may not be available in many areas. It's a plastic product that can be purchased in various sheet sizes and thicknesses. The main drawback aside from the cost is the weight. I've never weighed it but I estimate it to be nearly twice the weight of an equal size sheet of plywood.
However, the material is entirely impermeable and pretty much indestructable, does not stain, or allow waste to adhere to it. A cage built from it will easily last decades. Still, it's expensive, very heavy, and unless some color other than white is used, not a very pretty display piece.
Heating
There are several methods available for heating cages. What species the cage is for will determine in part what methods are appropriate. REMEMBER always check temperatures, do not guess. You would be surprised at just how far off you can be when trying to guess temperatures by feeling them with your hand. A digital indoor/outdoor thermometer with a probe works best for constant monitoring of the ambient cage temperature. In addition, I use a Raytec temperature gun to spot check the temperature in different points of the cage quickly. These non contact temp guns have come down alot in price in the last few years and can now be purchased for as little as $30. Believe me, if you can get one you will find them very useful. I recommend getting a model with a laser, this helps get you exactly on target. Nothing is better for checking the temps of a basking site, and getting a good idea of the temperature gradient in the cage quickly. Some heating options are:
- Flexwatt heat tape
- Heat pads
- Heat lamps
- Ceramic heat emitters
- Radiant heat panels
- Heat rocks
This is my preferred method of providing substrate heat. Flexwatt has versatile uses, and can be used inside or outside of the cages. I prefer to use it inside the cages myself, and this method normally requires the use of a thermostat of some sort. Flexwatt also requires you to do the wiring yourself, it is not difficult however. It provides an efficient method of heating, and is fairly economic. Another consideration when using flexwatt inside cages is electrical shock. Make sure the contacts are well insulated and protected from moisture. The metal contacts openly conduct electricity and will shock you to the touch. A spilled water dish will, in essence, charge the whole area so make sure the contacts are insulated. For directions on how to wire flexwatt heat tape, look at my Flexwatt Wiring Page.
There are several commercial heat pads available. Some are adhesive, as with the ZooMed UTH (under tank heaters), and some are not, such as the Cobra heat mats, manufactured by T-Rex. These are most suited to use with aquaria, but can have a certain degree of usefulness with custom built cages. Human heating pads can be used with herps only emergency situations, when you must heat a cage for a while until you get another means. When using these check the temperature with a thermometer to determine which of the three settings is best. These pads however are not designed to be operated constantly and many of the newer ones automatically shut off after a certain period of time. It's best to keep an extra heater on hand and never have to resort to using a human pad.
Heat lamps work well for diurnal basking lizards but are getting more difficult to use with the move away from incandescent lighting. An alternative is to use a ceramic heater for warmth and provide lighting by another means. When using a basking lamp though, ensure the animal cannot come in direct contact with the bulb.
These heaters are basically ceramic "bulbs" that give off heat but no light. They work well especially to provide a 24 hour heat source for arboreal snakes.
This is probably my favorite method of cage heating now that I have begun using them. They mount to the ceiling of the cage and have proven to be an excellent heat source.
You can read my review of the panels offered by Reptile Basics by clicking here
Heat rocks used to be one of the few choices we had for cage heating, but they are an exceedingly poor choice with the options we have today. Why they are still even manufactured is a mystery to me.
There are dangers associated with the use of heat rocks. They are known to develop hot spots, which are small areas on the rocks that reach extremely hot temperatures. This poses the risk of thermal burns to the animal. I have personally seen hot rocks reach such a temperature that the rock itself cracked apart.
Another risk I have seen personally is the risk of electrical shock. A long time ago I was using a hot rock to heat a snake cage. The snake had overturned the water dish and I was going to change the bedding and clean the cage. I picked up the hot rock, which was wet, and it shocked me. I inspected the rock closely and found no cracks or any observable damage, it was just conducting electricity through the rock itself. I suppose during the molding of that particular rock, the wire was very close to the surface. Even though the snake had only spilled the water a couple of hours before, I cringed at the thought of it getting shocked while attempting to warm itself. That was the last day I ever heated a cage with a heat rock. Fortunately, commercial heat pads were becoming available, and not long afterwards I discovered flexwatt.
Ventilation
There are several ways to ventilate a cage, some are better than others.
Wire mesh – I have used various forms of wire mesh for many years. Most commonly I have used ¼” hardware cloth, and recently have begun using black aluminum window screening because I like the looks of it. Care must be taken using wire though, and anytime you put a snake in a cage containing wire screen you should observe it closely for the first few weeks. Some individuals are prone to nose rubbing, and when this is done on wire, serious injuries can result. Some snakes will nose rub regardless of anything you try, but keep in mind if you have a snake doing this that sometimes it is just a sign that the animal is not content with it’s surroundings. It could be that the snake is not comfortable with its temperature choices, or feels insecure from a lack of hiding areas it finds suitable. Sometimes evaluating the cage conditions can cure a snake from constantly looking for a way out.
Pegboard – this can make for a very good vent covering, particularly if the animal being housed is prone to nose rubbing. The wooden pegboard however can leave a lot to be desired aesthetically, but I find if painted black it looks quite good. There is also available white plastic pegboard that is a little more expensive, but I think would look very nice in a cage. If using the wooden pegboard, I would recommend getting the ¼” thick board rather than the thinner board that is available. The thicker board will hold up better.
You can see an example of pegboard used for vents on the page detailing the 4x2 cage build.
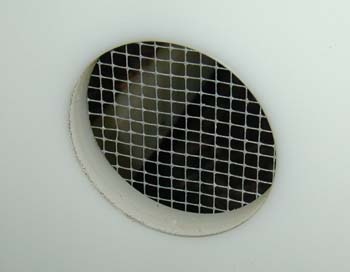
Metal vents – There are available round metal vents that are louvered. They would make a nice looking vent in many cages, but will need to be secured properly. They come in several diameters, I have seen up to 4” vents in the hardware store. The main drawback with them is they simply pop into a hole cut with a hole saw. While they have raised knobs on the section that goes into the wall, they will not withstand the pressure of a snake determined to pop them out. A couple of screws through the ring into the wood, or perhaps a bead of silicon will be required to secure them into place.
Doors
There are numerous ways to fashion doors for reptile cages, and from the feedback I have had, this remains one of the most difficult aspects of cage building. Some of my earlier door designs were cumbersome to make, and many were not much to look at. Over the years though, I have refined my door making and come up with a few styles that suit my purposes of usable, and basically easy to make.
There are a few pictures included in this section of the different types of doors I have used on my cages.
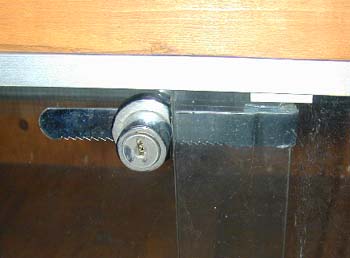
Sliding glass doors – This is a popular type of door used by many who build cages. I have only one cage with sliding doors though. I find them more difficult to deal with than the standard hinged door. Sliding doors require the track to be installed fairly exactly, and also need special locks to secure them. I couldn’t find any satisfactory method of latching the sliding doors other than the use of locks made for the purpose, and that required the use of a key to access the cage. I quickly determined that this was not the way I wanted to go with future snake cages so I abandoned the method. These problems though are mainly when they are used in snake cages. Sliding doors used in tall cages housing day geckos for instance would not need the locks to secure them since those animals would not be able to push the door open. Care must be taken however in this setup to make sure you get the door completely closed and not leave a gap for the gecko to crawl through.
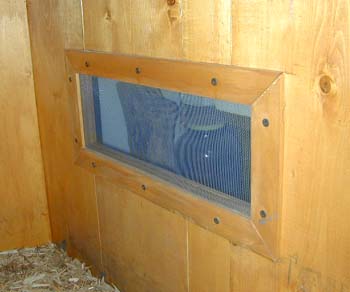
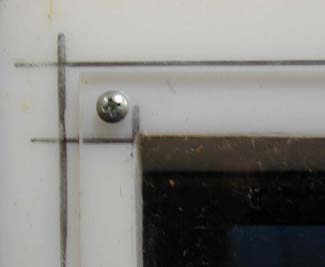
Framed glass I like this type of door. Simply cut the door frame like you would a picture frame, on 45° angles. On the backside of the door make a recess with a router for the glass to lay in. You can use silicon to hold the glass securely in the recess and renforce it with small pieces of wood over the corners, in such a way that they are not visible from the outside. In the picture below, you can see the recess made with a router for the glass to lay in. The glass is 1/4" thick, and the recess was routed the same depth, so that the glass fits flush. A bead of silicon around the entire recess holds the glass in place.
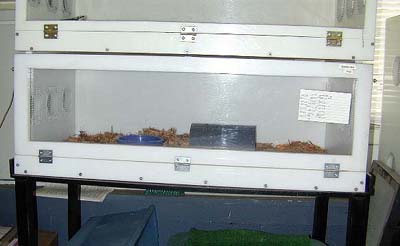
Plexiglass I like plexiglass, particularly in certain situations. You can use it in different ways, with or without a frame. It drills easily, and you can attach hinges directly to it. Plex does scratch easily, and for that reason it is not a good choice for cages housing clawed lizards like bearded dragons or monitors. Some care must also be taken when cleaning plexiglass doors. Plain water works best, as some cleaners seem to have a bad effect on plex making it look cloudy. It scratches easily when cleaning too, so keep this in mind. See the Building Tips section at the bottom of the page for some things to remember when working with plexiglass.
Plex can be screwed to a door frame to avoid the need to use a router.
The door and cage is made of HDPE.
This is the same door from the outside. It is latched with hook and eye latches. The piece it is hinged to doubles as a substrate dam.
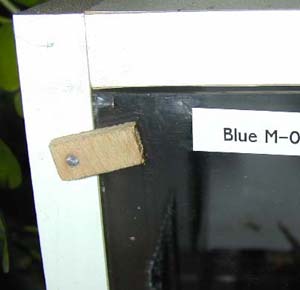
Plex used without a frame, hinged inside the door opening. Notice the peg behind the corner of the door to keep it from closing too far into the cage.
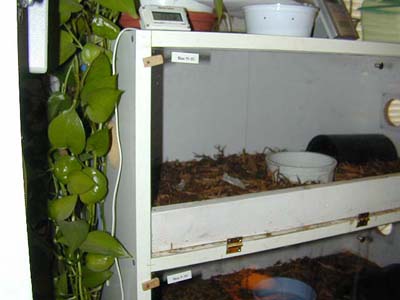
The same door from the outside. Wooden tabs that pivot on a nail hold the doors closed in this unit.
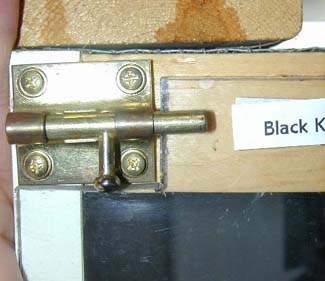
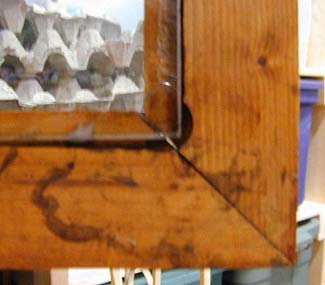
This is another method of latching unframed plexiglass doors. I simply cut the corner out of the door and used a barrel bolt to hold it closed. For security, I like this method very well, but it's not particularly nice looking. If you use 1/4" plexiglass, you will have to put a spacer under the barrel bolt to raise it slightly so it will slide over the door. In this instance I used a metal washer and tightened the bolt down on it.
Lighting
The majority of snakes will do fine with no supplemental cage lighting at all. They spend most of their days in hiding anyway, and room lighting is adequate for photoperiod concerns. Diurnal lizards however, benefit greatly from an established photoperiod, and bright light during the day.
Flourescent lighting – probably the best method of adding light to a cage without generating excess heat is to use flourescent lights. These come in a variety of shapes and sizes. Visit a Lowe’s or Home Depot to see what type would work best for you.
Incandescent lighting – these lights will work fine for cage lighting, but they will also generate heat relative to their wattage. For diurnal basking species, this is ideal, since you provide both light and heat from a single source. Caution must be used with incandescent lights though to make sure the animal doesn’t come in direct contact with the bulb. Most all bulbs, particularly those of wattages high enough to be used in a cage, will get extremely hot and will easily burn an animal unfortunate enough to touch it. Ideally, these lights should be placed outside the cage, but if used inside, should be shielded to prevent any contact with them.
Applying a Finish
The only finish I have used is oil based stain with a polyurethane topcoat, so I will limit my comments to this only. Before applying a coat of stain, I recommend sanding the wood well to smooth any rough areas. This is where an electric sander, either a palm or belt type, comes in very handy.
Once sanded, dust it well. A tack rag is good for this. It will take some practice to become skilled in applying stain and to get used to how to work with it. Some woods soak up the stain much quicker than others. You will find a single coat will actually be different in color when used on different types of wood. Apply the stain lightly, especially with soft woods, and make sure you apply it evenly so you get an even coloration.
Remember, if the first coat is not dark enough, you can always add another, but if you soak too much stain at first and make it too dark, you can’t lighten it up again.
After it is stained, you’ll want to give it another light sanding, and dusting, before applying the first coat of polyurethane.
I like satin finish polyurethane. Gloss is just too shiny for my tastes, and satin gives a nice finish.
After the polyurethane has dried, sand it smooth and dust it before applying a second coat. I recommend at least two coats for a nice finish, and it will get better with more. Don’t apply a heavy coat of polyurethane, several thin coats results in a much better finish that one heavy one. On some furniture, I have used up to 5 coats of polyurethane for an excellent finish, but I normally stop at 2 or 3 with cages. A good finish can make a decent cage look great, but a bad finish can make a nice cage look terrible.
Remember when using stain and polyurethane to air the cage out well before putting any animals in it. I prefer to air a cage outdoors, in the sun if possible, for a minimum of 3 days. Five days to a week is even better, but if the weather is warm 3 days outside will usually do.
Alternative Methods of Sealing the Interior
In the early days of my cage building I stained the interior and then applied 5 or so good coats of polyurethane to seal and protect the wood. This worked reasonably well, but it was time consuming and after 2-3 years the finish was worn and needed to be reapplied.
You don't have to use a wood finish on the interior of the cage. There are other options available to seal the wood which can last much longer.
Linoleum - Everyone knows what this is, it probably protects your kitchen floor. Linoleum comes in many patterns with widely varying price.
Since the cage floor will be covered by substrate, you can opt for the cheapest linoleum you find, which is often also the least appealing pattern haha. It's easy to work with and can be secured permanently to the wood of a cage using contact cement. If it will stand up for years in a kitchen or bathroom, it will do fine in a snake cage, and it is my preferred method of sealing plywood cage floors.
Use only linoleum sheeting, do not use the tiles which will have seams where they meet. Cut the linoleum larger than the cage floor, apply it with contact cement and trim the excess away prior to assembly.
Sintra - Sintra is a ridgid foam core expanded PVC. Some of the commercial cage manufacturers use this material to build their cages.
It comes in varying thicknesses but you are limited to 3mm and 4mm for colors. However it can be painted. I haven't used this material yet, but it would make a good covering for the inside of a cage.
It can be glued or screwed, and the thinner pieces, like the 3mm can be cut with a razor knife.
You can find this material at a local sign shop.
Vinyl Sheeting - Sheet vinyl is also used in the sign business. I believe it would make a fine cage sealant when applied properly. The only drawback I have with it is the glossy finish. I prefer more of a matte finish inside a cage. It is however available in a multitude of colors, and easy to work with.
It can be purchased at http://www.beacongraphics.com/
Building Tips
- The first rule of cage building is never throw away your scrap. Unless it's the smallest, most obviously useless piece, keep it. Your wife will question you reasons for stockpiling your leftovers, and perhaps even make fun of you. Pay no attention to her for she knows not what you do.
I can't remember the times I've needed some small something, not only in cage building, but in other things around the house, and been very glad to have my scrap pile on hand. Virtually every cage I build uses some scrap from a previous job and also leaves a little behind for the next time. - There’s an old carpenter’s saying: Measure twice, cut once. Make sure your measurement is correct before cutting the wood.
- Make your cuts square. It is imperative that you make straight cuts. The term “square” means that the corners are exactly a 90° angle, and the length of the cut is straight. If the pieces are out of square, it will not only make the cage difficult to assemble, but will hurt the finished look of the enclosure.
- Pre-drill your screw holes. Drilling a pilot hole will make sure the screw doesn’t run out the side, or split the wood when you tighten it.
- Do not hinge your doors up. Rectangular doors should open downwards, and square doors can either open down or hinge to the side. Doors that open up are difficult to use because they will require one hand to hold the door up, leaving you with only one to service the cage with.
- Measure doorways the cage may have to go through. If you are building a wide cage, make sure it will fit through all doorways it will have to go through before making it.
- Use wheels. If you are making a large cage or rack that will sit on the floor, put wheels on the bottom to make moving it around far easier.
- Substrate dams. If you plan on using any loose substrate material, you will want to include a substrate dam to hold the bedding in place when the door is opened.
This is a must with sliding glass doors, or you will constantly be removing bedding from the track, but it is also a great help with any type of door, keeping your substrate in the cage and not on the floor. - Acrylic - When cutting acrylic, clamp the strait egde and the acrylic down to a solid surface. Scribe your break line deeply, especially with 1/4" acrylic. The scribe line should be at least half way through the sheet before breaking. Using a shallow scribe line will easily allow the break to run off to the side.
- Acrylic can be cut on a table saw. I've done it, but safety glasses are a must. The edge will also be rough and will need to be sanded before use. Scribing and breaking is the best option.
- Drilling acrylic - When drilling holes for hinges or what have you, you must excercise caution so as not to break the acrylic. Place a piece of scrap wood under the area you are going to drill. Keep pressure on the acrylic as you drill so the bit passes through the plastic and into the wood, this will limit chipping as the bit completes the hole.
Do not use too much pressure on the drill, allow the bit to make the hole slowly. The weight of the drill is usually enough to make the hole once it is started. Trying to push it will crack the acrylic.
Keep the drill at a 90° angle to the acrylic. If it leans you will easily crack the plastic.
I do not recommend drilling a pilot hole in the acrylic. This causes the larger bit to take too much of a hold and thread itself into the acrylic much too quickly resulting in cracking. A small indent can be made with a small bit, just to give the large bit a place to start, but do not make an actual pilot hole. - Cutting glass - Your glass cutting tool has a scribe wheel on one end and a steel ball on the other. Line up your straight edge along the cut line and draw the scribe tool across the glass once. Multiple passes will dull the tool.
After you scribe the line, pull the piece to be cut off over the edge of the table and use the round end of the cutting tool to tap along the underside of the scribe line. Be careful doing this and do not use too much force. You will see the break form as you move along the line.
NEVER attempt to cut tempered glass, it has to be ordered to size. - Test all light fixtures before installing them in a cage. This is especially important of your using a prewired flourescent fixture and have to cut the wire to install it. I have done this only to discover that the light was defective. Since the wire was already cut, I couldn't return the fixture.
- Never be afraid to borrow ideas you see if they'll make your cages better. Many of the designs I use are my own, and come from many hours of thinking and alot of failed tests. Others I have come across here and there and really liked the technique, so I incorporated it into my own cages. Through this process you'll eventually achieve a design that works best for you, even though it may differ a little from what works best for me.