
*NOTE: The information on this page applies only to the shipping of nonvenomous reptiles. The transport of venomous herps is governed by specific laws and policies and will not be covered on this page. I am not a shipper of venomous, but if someone well experienced in the process would like to write up a detailed description, with pictures, of the proper, legal, way to do it, I would be glad to post it here.
Probably the biggest problem for someone new to shipping reptiles is actually getting the approval of one of the carriers to ship through them. Now there is finally a reliable alternative. I use and recommend ShipYourReptiles.com
I see on a regular basis questions concerning the different aspects of shipping reptiles. It seems to be a point of considerable confusion and some misunderstanding among those who are new to the practice.
The intent of this page will be to introduce you to the proper methods of shipping reptiles, including packaging, and selecting a carrier.
Preparing the Box
The first consideration is to prepare a proper box in which to pack the reptile. This is one of the most important parts, as the box will be the basis for ensuring safe shipment of the animal.
The only acceptable box to use is one that is lined with styrofoam insulation. Even in mild weather, the insulation is still an important part of the package. It forms a buffer between the animal and the outside temperatures, and protects it from sudden changes in temperature. In very cold or hot weather, it will greatly aid in the use of hot or cold packs. In cold temperatures, and even more so in hot temperatures, not using an insulated box can and often is a death sentence to the animal inside.
You can purchase ready made insulated boxes for shipping from several reptile supply dealers, or you can make your own. I prefer the latter. Most of the supply companies charge from $3.50 to $5.00 per box, but you can make a better box for less money.
For several years I recycled boxes from the trash, lining them with styrofoam, and used them for shipping. This works fine, and there's nothing wrong with it at all, as long as you find boxes that are not damaged, or soiled. I eventually got tired of always trying to locate the appropriate size box, especially when my shipping began to increase, so I decided to order new boxes of a uniform size.
I order from Associated Bag, and boxes the perfect size for most normal reptile shipments run $0.45 to $0.50 each. Not bad at all really, especially considering the time saved, and the fact they are all the same size which makes them easier to insulate.
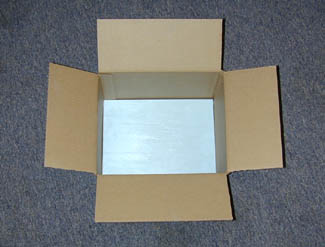
For the styrofoam lining, I use 3/4" blueboard. This is an insulation board sold at most construction supply stores such as Lowe's. I pay $9.50 or so per sheet, but I haven't compared prices. The blueboard is also superior to the insulation found in the ready made boxes. It is more dense, and thicker than the normally 1/2" styrofoam provided with the commercial boxes.
The overall cost to make these comes to around $2.00 per box, I would estimate, however I haven't figured it out exactly. At any rate, you get a better box for less money.
Below is a series of pictures detailing how to line the boxes.


Packing the Animal
The first consideration is the condition of the animal itself. It should be well hydrated, and the gut should be empty. Refrain from feeding the animal for 3 days before shipping. The temperature in the container will likely not be appropriate for digestion, and any rough handling along the way may result in regurgitation.
Any sick, gravid, or otherwise compromised specimens should not be shipped at all.
The animal itself will need to be in an additional container inside the box. Depending on the animal, this may be a breatheable bag, or a deli cup of some type.
All hatchling and small snakes and lizards should be inside a deli cup. There are many suppliers of these containers, and I get mine from Superior Shipping Supplies. Getting the pre punched cups is advised. The extra cost is nominal, and the convenience is well worth it.
Some form of bedding or other material should be used inside the container to cushion the herp from being jostled about, and to absorb any fecal matter that may be passed enroute. I have used paper towel, wood shavings, and shredded newspaper.
When shipping amphibians, paper towel would be preferred and this should be misted lightly to keep adequate humidity during transit. For other species, the container should be completely dry, but the animal well hydrated prior to packing.
Remember, always tape the lids of the deli cups down. Don't trust them to remain in place. The cheaper cups especially do not always make a tight fit, and the scotch tape is an additional safe guard against the animal getting out inside the box.
Adult snakes are best shipped inside a snake bag. These can be bags manufactured for the purpose, or you can use pillowcases. The main thing is that the fabric is breathable, meaning the snake will have no trouble getting air. You can put some shredded newspaper inside the bag with the snake, but I often do not.
The bag will have to be closed securely. You can tie a knot in the fabric, or use a rubberband. I prefer the rubberbands myself. I make sure the snake is at the bottom of the bag and twist the fabric tightly for a space of 3-4 inches. Then fold this down and put a rubberband tightly around the top. Alternatively, you can use clear packing tape for this. It can be very aggravating to get into, but there's no chance of the snake getting out.
Below are some pictures detailing both methods of containing a snake.


Make sure the container is cushioned on all sides inside the box. You want to limit as much movement as possible during transit. You can use crumpled newspaper, shredded newspaper, or packing peanuts as a packing material.
Start by putting some of the material inside the box to support the container. Sit the container on this layer of padding and fill in all around it so that it is held securely. Then add additional material on top of the box so that when the lid is placed on it will remain in place with very little movement.


Hot and Cold Packs
The need for a hot or cold pack will depend on the temperatures the package will be exposed to on its way to the destination. As a general rule, if the temperatures are between 65 and 80°F I normally don't use either. If the temperature exceeds this range I use the approrpiate pack to help keep the proper temps inside the box.
When using either of these, it is important not to let them lay in direct contact with the container holding the reptile. They are there to change the air temperature inside the box, not to heat or cool the animal directly.
Heat packs are chemically activated and can only be used once. When the pack is exposed to the air and shaken, it reacts with the oxygen to generate heat. Nothing less than a 35-40 hour heat pack should be used. The hand warmers sold at Wal Mart are not adequate for this purpose and should not be considered at all. I used to order my heat packs from RLD Enterprises, as they had the best heat packs available, but they have apparently gone out of business. You can still get UniHeat packs from Superior Shipping Supplies among other places.
To use a heat pack remove it from the plastic bag and shake it very well for a minute or so, then tape it to the inside of the lid of the box. Remember, they require oxygen to create the heat, so only tape the edges enough to secure them, but do not cover them so they cannot get the needed air. Some heat packs have one perforated side, and one side that is not perforated. The perforated side allows exposure to oxygen, so this side should always face into the box, not against it.
Generally only 30 and 40 hour heat packs are used to ship reptiles. There are differences in the two. A 30 hour heat pack will reach a surface temperature of about 115° at it's peak. It takes 20-30 minutes to activate, and peaks betwen 12 and 14 hours. A 40 hour pack takes 40-50 minutes to fully activate and will peak at 110°or so at 17-19 hours.
Depending on the size of the box, or the severity of the weather, more than one heat pack may be necessary, use your own judgement. In a 12x12x12 box, one heat pack will raise the temperature approximately 12-16 degrees, and each additional pack will add another 10 degrees. This will vary to an extent with the quality of the insulation of the box and the severity of the outside temperatures. Insulate very well in winter.
Cold packs are reusable. You can get these at any Wal Mart, in the cooler section. They are normally used in coolers to keep drinks or food cold.
When using a cold pack, I pack the animal, but leave the lid off the box. I put the pack in when the driver arrives so that it has the maximum time to remain frozen. It's a good idea to wrap the cold pack in a paper towel to soak up any condensation given off as it thaws. Again, place the pack so that it cannot come in direct contact with the container holding the reptile.


Air Holes
Some people feel air holes are required and some do not. I personally do not use them. I feel if holes are punched in the box, then the insulation properties are compromised. An alternative is to make holes in the cardboard only, but not in the styrofoam itself.It's basically impossible to make one of these boxes air tight, so the risk of suffocating an animal is almost non existent. The styrofoam will not fit together perfectly and the cardboard box itself "breathes" somewhat. I also do not completely seal the seams with packing tape.
It is my opinion than especially in cold or hot weather, you are hindering your efforts to maintain a safe temperature in the box if you make holes in it so that outside air flows freely inside.
Choosing a Carrier
Deciding which carrier to use to ship your reptile has to be the issue that generates more confusion, misunderstanding, and questions, than any other part of shipping live reptiles.You have several choices. First, the best method of shipping is of course Delta Dash. You send the package in the morning and it arrives the same day. They also openly accept reptiles, and have a degree of guarantee as to their safe arrival. However, before you can ship through the major airlines, you have to become a "known shipper", and this takes some effort, including having an airline representative visit your home or place of buisness.
It is also the most costly method of shipping, and frankly will not be readily utilized by those shipping the cheaper animals. Someone ordering a $20 leopard gecko, will not want to pay $65 to have it shipped to them. This leaves some other options.
First off you have the United States Postal Service. This is one I do not recommend fo rshipping reptiles. Their overnight service has become very unreliable, and while I use them almost exclusively to ship feeder insects, I would never send a live reptile using this method. Furthermore it is illegal to ship snakes via USPS, DO NOT do it. We have enough bad press in this hobby so don't be stupid and bring more upon us.
This leaves the three major overnight carriers, UPS, FedEx, and DHL. Let's look at them individually.
UPS - I personally do not like UPS. I have found them to be very rough on packages, and somewhat unreliable with delivery. They will accept reptiles, but you have to jump through a few hoops to get permission. To make it more difficult, it's hard to get two people form UPS to give you the same story concerning this, they apparently make no real effort to get everyone on the same page.
FedEx - I use FedEx for my overnight shipping. They are now allowing people to ship live reptiles, but you have to jump through some hoops. There are some stipulations we hope will be addressed, but it is a step in the right direction. See this thread on Fauna Classifieds for details on getting a waiver to ship.
DHL - I've never used DHL myself. I used to use them when they were Airborne Express, but their service begin to be lacking and I left them before they merged with DHL. Soon after the merger, DHL began taking an active approach to eliminate the shipping of reptiles entirely.
Several people who had spent years a a customer of Airborne, and some who spent tens of thousands of dollars annualy with them were told their business was no longer welcome. To make matters worse, it was usually after they had taken packages for shipment which they then refused to return resulting in the shipper having to go get them.
I encourage you to avoid DHL for any of your shipping needs.
There are problems with all the overnight carriers. Some are better or worse in different areas. I have received animals from all of them and have had problems with all of them on occasion. Overall though, the problems are few when the number of shipments I have received is taken into consideration. There is no foolproof method to ship reptiles overnight, but with the proper packaging, the animal will arrive safely.
The main thing to remember, no matter what carrier you use, is to ship responsibly. Make sure there is no chance of the animal escaping enroute. We have hopes of at least one of the carriers to begin accepting reptiles completely, but any incident of escape severly undermines the efforts to get that accomplished. Recently a 7 foot burmese escaped in a UPS truck due to completely idiotic shipping methods. Incidents such as this go much farther to keep the restrictions in place than 100 good shipments do to get them changed.
Labeling
Do not try to be sneaky and label a reptile shipment fragile, perishable, glass, or any other misleading way. This will cause problems if the carrier discovers you have lied about the contents. It is also very possible that mislabeling a package can cause you to be in violation of the Lacy Act, which can get you in some serious hot water with the Federal government. We have discussed this possibility in the past, and so far there is no concrete explanation of this. Some interpret the Act to say that all shipments must be labeled with both the common and scientific names of the reptile, while others read it to mean that only species covered by the Act are included. We really need the opinion of a lawyer versed on the topic, or a definate answer from the US Fish and Wildlife department. So far however, neither has happened, but be aware of the possibility.At the very least, label the package "Live Harmless Reptiles" and include the scientific name somewhere on the documentation with the carrier.
I use the methods outlined here to ship my reptiles, and to date haven't lost a single animal in shipping.
I hear reports regularly of poor shipping methods. It takes so very little effort to ship a reptile properly, there is simply no excuse for the level of sheer stupidity some people display. I find it difficult to comprehend just what some people are thinking when they pack a turtle in an empty unlined Priority Mail box with no padding then can't understand why it died on the way. Use your common sense, and put forth the extra effort to do it right, for the sake of the animals as well as the rest of us in this hobby.
Final Note
The information I have presented here is all the information I have to offer. If you have a question on the packing methods used to ship a reptile, then email me and I'll do my best to help you.However, I can offer no further help on such things as choosing a carrier so please do not email me asking what to do when you've called UPS and have been told by the counter lackey that they do not accept reptiles for shipment. Any such emails will not be answered. Please refer to the thread on Fauna Classifieds listed above for information on getting a FedEx certification.
Also, I've gotten several emails asking how to pack a 12 foot burmese or the like for shipment via FedEx. Please use some common sense and realize that any snake of that size is only suitable for shipment via the airlines